Table of Contents
Hosting Virtual Circles
Heather Plett has held in-person circles and online circles with people all over the world and, in a blog post for The Circle Way, she describes the difference:
After a dozen online circles and about half as many in-person circles (using essentially the same material and flow of the day), one thing, in particular, surprised me. In an online space, where people are sitting in their own homes and know that they will probably never meet the people they see on the screen, the deep dive into vulnerability and trust happens more quickly than when people are sitting in the same room. At first, I thought it was just an anomaly based on who had gathered for each circle, but then I started to pay more careful attention and realized it was a pattern.
I now believe that it is possible to create an online space that invites people very quickly into deep work. It is even possible that this can happen more effectively and with fewer barriers than when people are sitting in the same room. (Emphasis Heather’s.)
Virtual circles are different from, but not inferior to, in-person circles. This guide is designed to help you succeed in hosting virtual circles and assumes that you know how to hold a physical one. If you need a refresher, you’ll find it on this website,
Differences between physical and virtual circles
The following table shows how to transfer what you’re accustomed to doing in physical circles to virtual circles.
| What you’re used to | What you can do instead |
| A center with a lit candle and possibly other objects (such as flowers) | Each participant can light a candle of his/her own, adding any other objects that are meaningful. For example, in a grief circle, participants might also display a photo of a lost loved one. |
| A single talking piece | All participants can have a talking piece of their own. |
| Holding a common talking piece while speaking | Participants can hold their own personal talking piece while speaking. This tangible cue reminds them to speak only when it’s in their hand (and not to speak when it isn’t). |
| Visual cues: passing a common talking piece from hand to hand | Verbal and visual cues
Participants can:
|
| Reading the agreements | Agreements can simply be read by the host as in physical circles or they can be screen-shared so everyone can see them and a participant can read them aloud. Agreements can also be included in the invitation. |
| Reading a poem or sharing a photo | As above, text can be screen-shared and so can images. |
Advantages of holding circles virtually
| In physical circles | In virtual circles |
| Participants have to travel, facing challenges such as darkness, inclement weather, and bad traffic. Travel also takes time. | Travel is unnecessary, takes no time, and causes no stress. |
| Participants have to be in a space that exposes some to risks. For example, chemically sensitive participants may react to another’s deodorant or perfume. | Participants can stay safe in their own environments. |
| Immunocompromised participants may put their health at risk by participating in circles in which they could catch an illness from another. | Participants can benefit from social support without fear of contagion. |
| Caregivers have to find respite care to leave their loved ones. | Caregivers can stay in the same place as their loved ones. |
Virtual circle features that don’t exist in physical circles
- In Zoom, there’s a chatbox you can use to type or paste links, questions, creative writing, and other communications. Hosts can copy this text and email it to participants afterward.
- There are several ways to join a circle, one high-tech (video conference) the other low-tech (telephone).
Challenges in virtual circles
| Challenge | What you can do about it |
| Background noise | To eliminate the interference of dogs barking and phones and doorbells ringing, participants can mute their microphones when they aren’t talking. Hosts can also mute all participants at once, allowing them to unmute themselves whenever they wish to speak. However, in smaller circles, leaving all microphones unmuted enables participants to hear spontaneous group responses, which can be comforting. |
| Visual distractions | Hosts can turn off a participant’s video.
If participants need to step away from their device for a moment, or are interrupted by a family member, they can turn off their own video. |
| Equipment issues | You can avoid technical issues by giving participants the opportunity to test their equipment before your circle begins. They can join a test meeting, then test their video and audio.
Those whose computers and internet connections are inadequate for video conferencing can join a circle by phone. |
| Tech support | It’s best if your circle has a guardian who can act as an alternate Zoom host and provide support for people who are having trouble getting online. |
Ritual elements
Use the same ritual elements in virtual circles that you would in physical circles. For example, you can:
- Use a bell to begin and end a circle or mark a period of silence
- Encourage participants to light their own candles
- Make sure participants have a talking piece at the ready (as described earlier in this document).
Structure
Use the same structure for a virtual circle as you do a physical circle, including:
- Welcome
- Transition into the circle (for example by ringing a bell, observing a period of silence, or reading a quote or poem)
- Make introductions (if necessary)
- Share intention and agreements
- Check-in/share from the heart
- Harvest
- Close
Video vs. phone
- Phoning it in: Information about how to join a circle by phone should be included with every invitation, and it’s important to share it with your participants so they have a Plan B. However, video is far preferable, particularly in the early stages of a group’s formation, so try to make supporting video conferencing a priority.
- Camera-shy participants: Some participants turn off their video cameras because they don’t like how they look, but seeing each other is important and builds trust. It’s more difficult to be vulnerable when one of the members of your group shows up as a black square. Encourage all your participants to turn on their video cameras (unless they need to step away from their computers for a moment or are interrupted by a family member).
How-to
Basic instructions for hosts
The instructions in this section are all you need to host a circle. There’s more to know, and you’ll find that information in the “Advanced instructions for hosts” section, but if you’re short on time, this information will enable you to host a virtual circle.
Obtaining links and IDs
Before you can invite people to your circle, you need a Zoom link, a telephone number, and a meeting ID. Healing Circles Langley has a volunteer scheduler who provides this information, and the following instructions assume you have a scheduler, too. If you are scheduling your own Zoom circle, you can obtain this information from Zoom.
Keeping it simple
By default, Zoom includes the following text in an invitation. This is overwhelming for those who have no experience with Zoom. The orange text is all you need, and you’ll see how to refer to it in the following section.
Join Zoom Meeting
Meeting ID: 466 513 561
One tap mobile
+16699006833,,466513561# US (San Jose)
+13462487799,,466513561# US (Houston)
Dial by your location
+1 669 900 6833 US (San Jose)
+1 346 248 7799 US (Houston)
+1 646 876 9923 US (New York)
+1 253 215 8782 US
+1 301 715 8592 US
+1 312 626 6799 US (Chicago)
Meeting ID: 466 513 561
Find your local number: https://zoom.us/u/achS6tPyFj
Inviting people to a circle
It’s best if you send two email messages to your participants. The first is an invitation sent well in advance of your circle. The second is a reminder sent the day before (or morning of) the circle. The reason for the second email message is that, by the time your circle takes place, your original invitation (along with instructions on how to connect) could be deep in the belly of your participants’ inboxes. It’s best to resend your invitation or send a reminder that contains the link, phone number, and meeting ID.
To invite participants to a virtual circle
- Obtain the link, telephone number, and meeting ID from your center’s scheduler.
- Copy the following text, paste it into an email message addressed to all the members of your group, and then customize and format it as needed.
At [time] on [date], please join the [subject] circle via Zoom by following the instructions below. Joining [number] minutes early will help us get started on time.
To join via computer, tablet, or smartphone (video conference: preferred)
> Click this link: [link provided by your center’s scheduler]
If you haven’t used Zoom before, you’ll be prompted to download and install it. Follow the instructions on your screen.
To join via phone (audio only)
> Dial [telephone number provided by your center’s scheduler]
> Enter the meeting ID: [provided by your center’s scheduler]
You don’t need a participant ID. If you’re prompted for one, just press #.
If you have trouble joining
> Call or text [technical guardian] at [cell number].
To prepare for your circle
- Prepare any screens you want to share (for example, agreements, or a poem).
- Light your candle and position any other objects that help you create sacred space.
- Make sure you have your talking piece.
- Ground yourself.
To start your circle
- Well before your circle begins, launch the Zoom program on your computer or device.
- You may have a free Zoom account of your own. A free account allows you to meet with three or more people for only 40 minutes. To prevent your circle from ending prematurely, ensure that you are logged in to a paid account.
- If you’re signed in to Zoom, sign out to be on the safe side. Then sign in again using the credentials your scheduler provides.
- After you’ve signed in, click the link in the invitation that you sent to your participants. This should launch Zoom with you as the only attendee.
- By default, Zoom now enables a waiting room. As people enter, a message such as the following appears. If you recognize the person who wants to join the circle, click Admit.
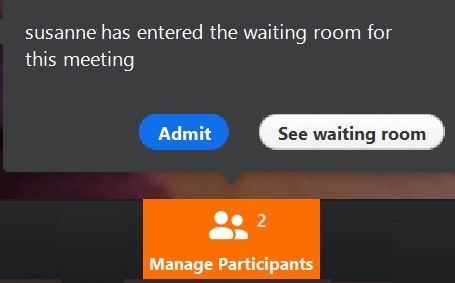
If the waiting room feature is not enabled, images of participants will appear on your screen as they enter. - After everyone is in the group and settled, make sure you see all participants by clicking the Gallery View button in the upper right corner of your Zoom Meeting screen and remind participants to do so as well. (If a Gallery View button doesn’t appear, you’re already in Gallery View.)

That’s it. Everything from this point forward is optional.
Advanced instructions for hosts
Empowering a guardian
Appointing a technical guardian can help you focus on hosting your circle. Make sure you and your guardian leave enough time to get set up before your circle begins, then follow this procedure.
To empower a guardian to share control of Zoom
- Have your guardian join the circle by clicking the link in the email you sent out
You should now both appear in the meeting. Your guardian may be placed in a waiting room. If that is the case, click Admit at the bottom of your screen.
- At the bottom of your Zoom Meeting screen, click Manage Participants.
The participants list opens.
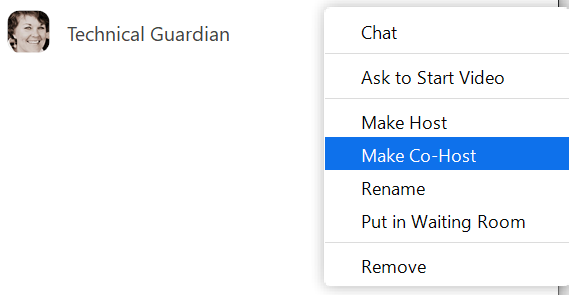
- In the Participants list, hover over the name of your guardian, click More, and then click Make Co-Host.
Sharing your screen
Images such as the following can support you in your circle. (This screen was created by adapting a video template at Canva.com—where you can create a free account.)
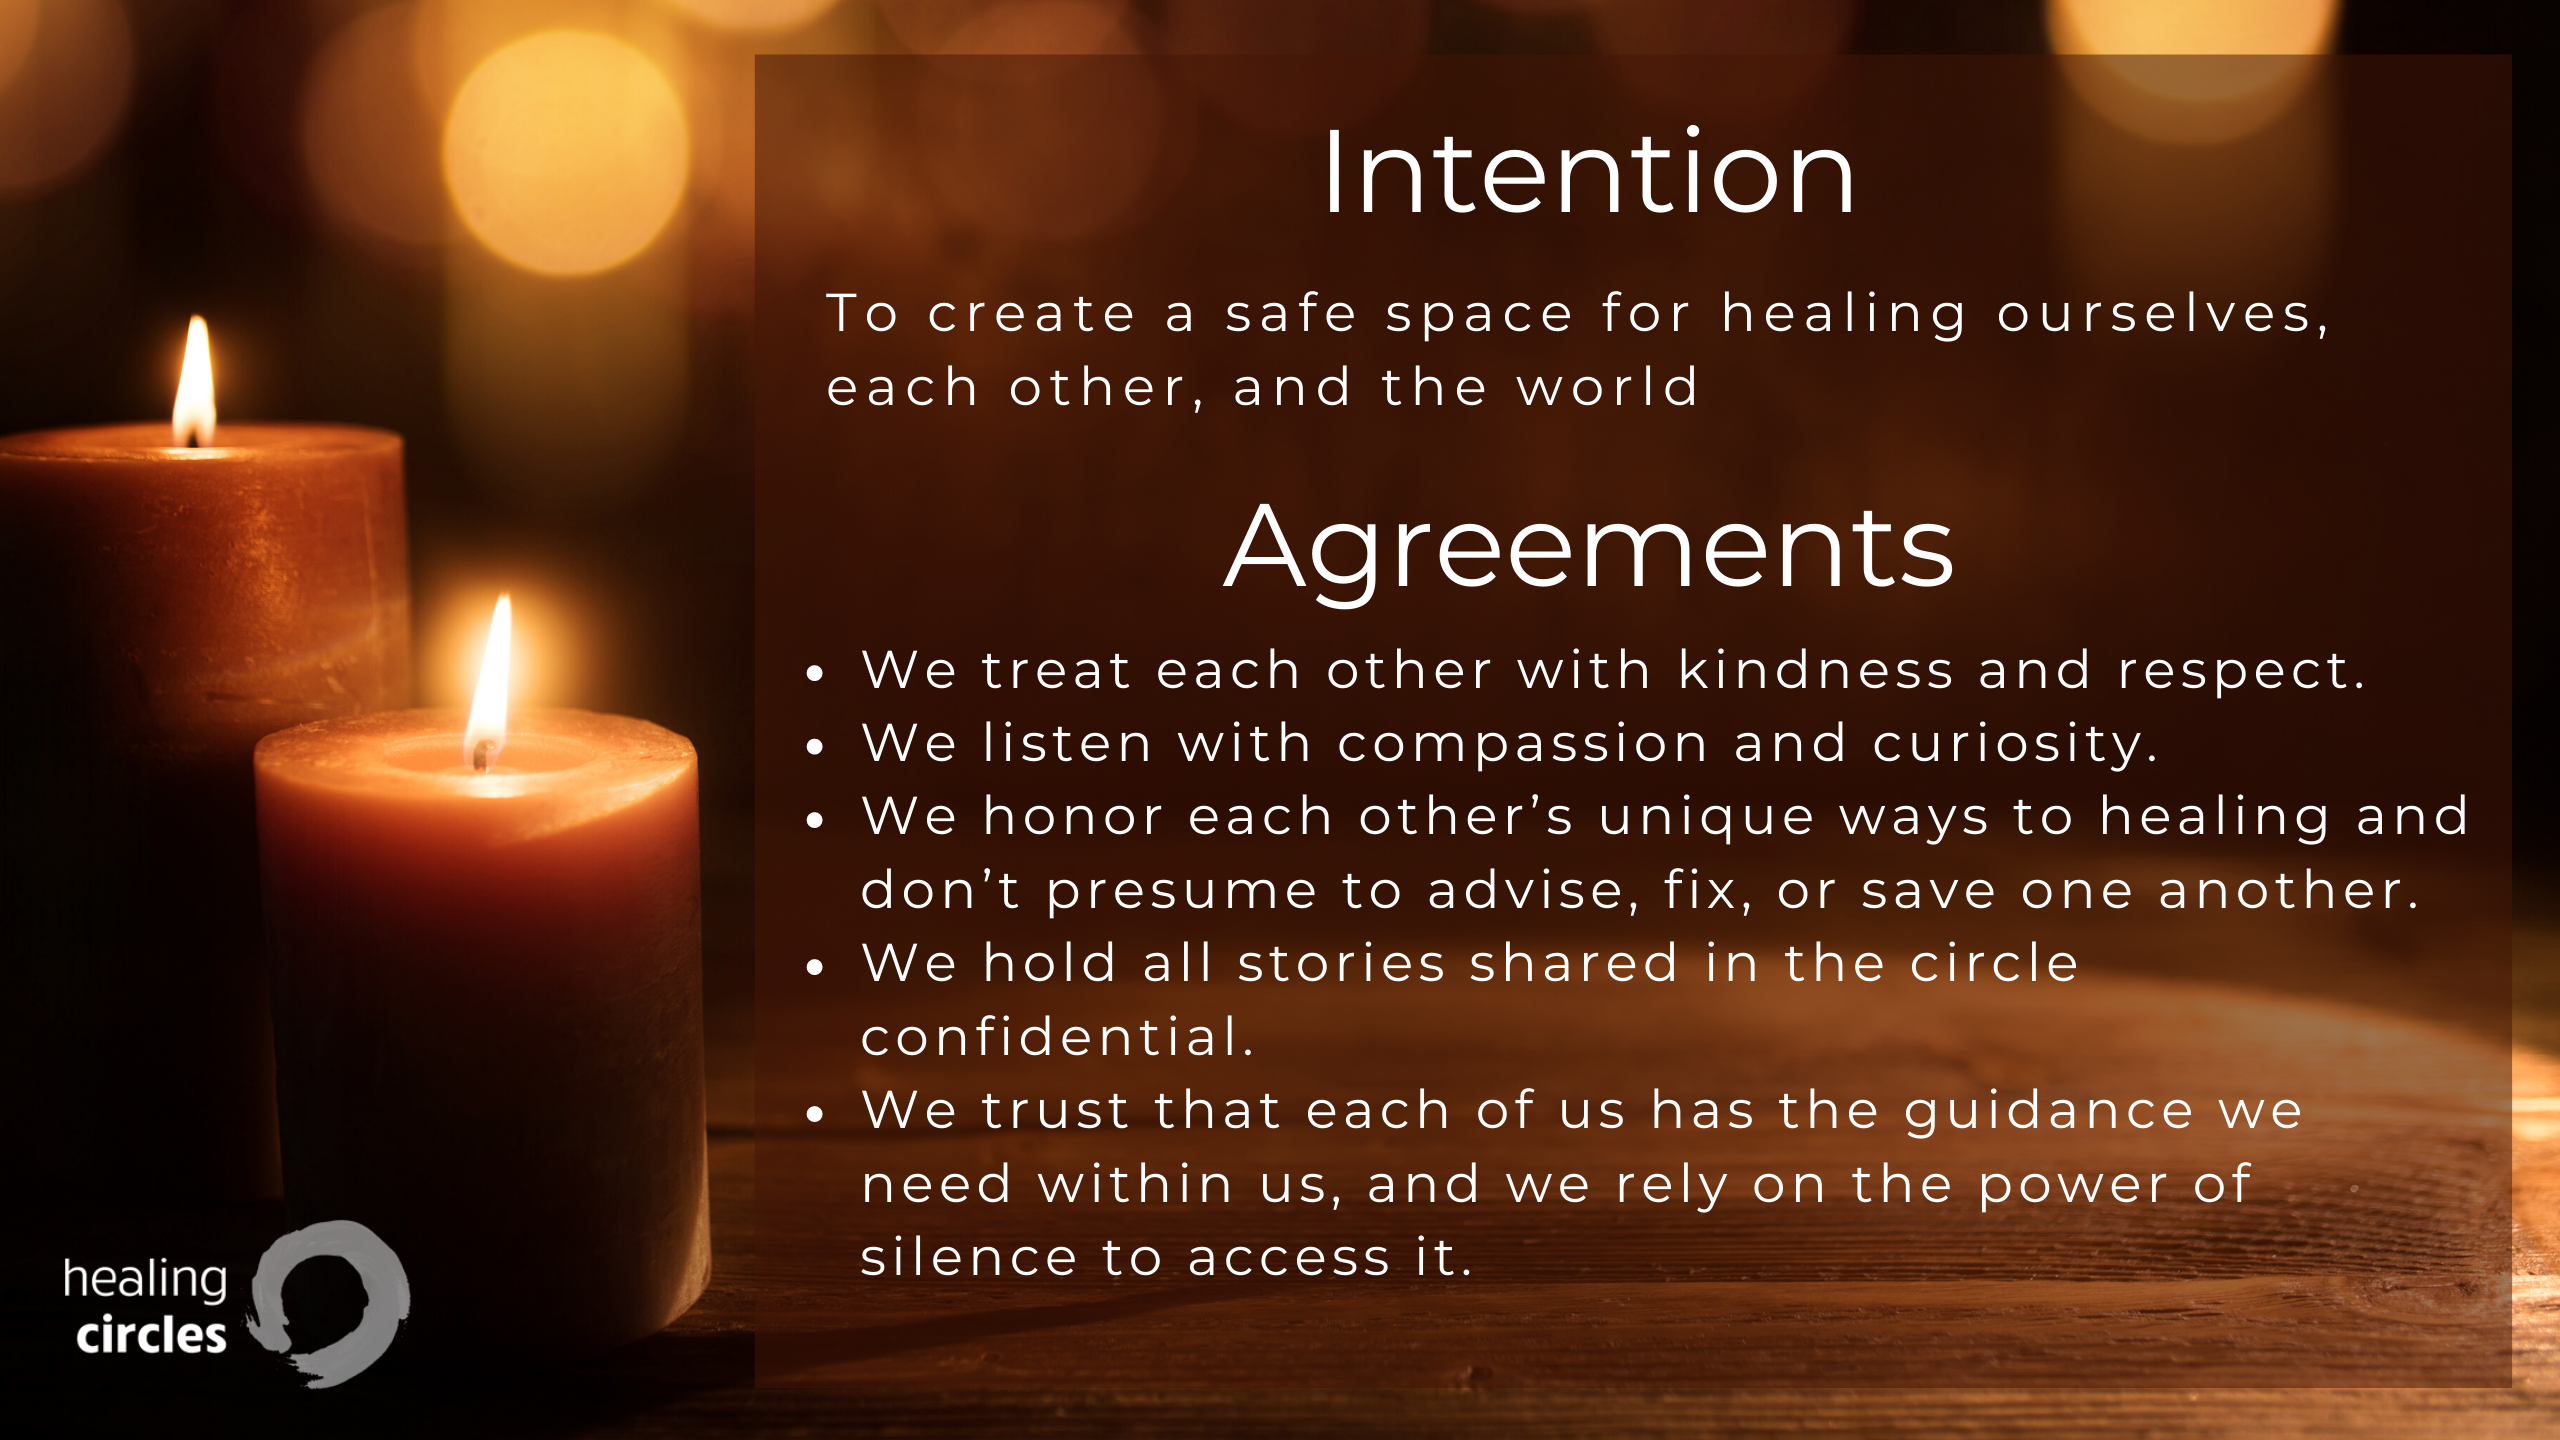
Sharing your screen requires the ability to switch between two running programs: Zoom and the program containing the text or image you want to share.
To share your screen
- Before your circle begins, start the program that contains the text or image you want to share, and then display it. For example, display a poem in Word or an image using your computer’s default photo app.
- In your circle, when you’re ready to display the text or image, click Share, which is located on the bottom of your Zoom Meeting screen.

- In the following dialog box, Screen is selected by default, so just click Share again.

- The text or image you prepared in Step 1 should appear on the screen of every video conferencing participant in the circle (those who join via a telephone number will not see it).
- To stop sharing your screen, click Stop Share at the top of your Zoom Meeting screen.

Managing participants
Hosts and co-hosts can manage participants in the following ways.
- Mute participants
- Allow participants to unmute themselves
- Request that a participant unmutes
- Stop a participant’s video
- Request that participants start their video
- Rename participants
- Allow participants to rename themselves
- Choose to play an enter or exit chime
- Lock the meeting to prevent anyone new from joining
- Prevent participants from sharing their screens
- Place participants in waiting room or admit/remove participants from the waiting room
Hosts can:
- Make a participant host or co-host
- Enable waiting room
You’ll find detailed instructions for accomplishing these things here.
Last-minute invitations
If your virtual circle has begun, and someone who would like to participate didn’t get the link, you can invite him or her at the last-minute from within Zoom.
To invite someone after a circle has begun
- At the bottom of your Zoom Meeting screen, click Manage Participants.
The Participants list opens. - At the bottom of the Participants list, click the Invite button.
The Invite people to join meeting dialog box appears. - At the bottom of the dialog box, click the Copy URL button.

- In an email message, Facebook Messenger, Skype messenger, or even SMS, paste the URL that you copied. (To quickly paste on a PC, press CTRL+V. To paste on a Mac, press COMMAND + V.)
